Understanding the Need to Restore Your WordPress Website’s backup
In this article, we’ll show you how to restore your WordPress website in minutes with our comprehensive step-by-step guide. We’ll highlight common issues faced by WordPress users, detail the steps to restore your website and give you peace of mind knowing you can do it yourself. Get ready to restore your website and get back to your online presence with ease. Usually your hosting company should do back up your website every day, having a website regularly backupped if a great way to have various restore points to set the website to its previous state.
Having a copy of your site is a good idea, cause you may need to restore it for a crash or from a malware injection that locked the site and it’s data.
If you’re using a VPS there could be various options, and i personally use a dedicated app called Backup Sheep
I integrated it wit Pcloud as it provides a lot of space with a lifetime deal and the company worked well for me.
I may sound repetitive but i suggest to back up your website as often as possible and set up a timeframe so the backups can be deleted regularly to avoid taking up too much space on your app or site.
It is quite simple to set up if you have a VPS and it can keep tracks of sql and files backups that we can use if needed. Choosing a backup tool like this can make a difference and you can use not only with WordPress powered websites.
If your hosting company instead uses Cpanel then it has some backup options to allow a full restore directly inbuilt, and you can always open a ticket.
Introduction – why you want to manually restore a wordpress site
Have you ever felt the frustration of losing all your hard work on a WordPress website because of an unexpected error or crash? It can be a devastating experience, and one that might harm your business or personal brand. The good news is that restoring your WordPress website doesn’t have to be complicated or time-consuming. In fact, with the right approach and techniques, you can restore your website in just a matter of minutes.
By the end of this article, you’ll learn how to access backup files, import data, adjust settings, and test your restored site before going live. Whether you’re a beginner or experienced WordPress user, this guide will give you the tools and knowledge needed to get back on track in no time.
Note that you can still use a backup plugin like wp-vivid that would instead make the process easy and fast, but this guide covers the “manual restoration” that’s something different, even if the final result will be the same. Creating a website backup with a plugin takes minutes and then to restore your site it will be indeed easier. But for a lot of reasons the process could not go well or you may not have access to the site anymore, so i suggest to always have a database backup and keeping in your sleeve another restore option that you can use if for some reason the wordpress plugin you were going to use it’s not going to work.
Preparing for the Restoration Process – Plan and Select the backup
The first step to backup and restore your WordPress website involves identifying the backup file for your website and ensuring you have access to it. It is important to note that the restoration process may involve some downtime for your website, so it is recommended that you inform your audience beforehand.Next, create a plan for the restoration process. This includes setting up a testing environment where you can test the restored website before making it live again. You should also have a checklist of all necessary steps and procedures required to complete the restoration process successfully. Finally, ensure that all necessary tools and resources are available before starting the restoration process. You will need access to FTP or cPanel credentials, database credentials, and most importantly, a reliable backup of your website files and database, last we will also use a search and replace plugin to make sure the DB entries have been correctly restored (ONLY if you plan to migrate the backup to another domain). By adequately preparing for the restoration process, you can significantly reduce downtime and ensure an efficient and effective recovery of your WordPress website in minutes.
FOUNDATIONS TO RESTORE A WORDPRESS FROM A BACKUP
It’s very important to understand the process, and I’ll make sure to keep it very simple and straightforward. If something doesn’t work well, then we can dig deeper, but if you follow this clean workflow, you’ll be fine.
The WordPress restoration process workflow when we have to restore a site TO THE SAME DOMAIN can be splitted into a few easy steps:
- Download the Backups and Extract to your local PC
- Upload the WordPress files to the server
- Import the Database via PHPMyAdmin or a similar tool
- Check wp-config.php to make sure the data connector is right
Step 1 : Accessing the WordPress Backup Files
The first step in restoring your WordPress website is to locate and access the backup files. Depending on how you created the backup, they may store it on your local computer or a remote server. If you’re not sure where to find your backup files, start by checking your hosting provider’s control panel or logging into your WordPress dashboard.Once you’ve located the backup file(s), it’s important to verify that they are complete and intact. A missing or corrupted file can lead to errors during the restoration process, so take the time to check each file carefully. Some common tools for verifying backups include checksums and CRC (cyclic redundancy check) tests. If you’re using a plugin or service to create backups automatically, make sure you know how to access those backups in case of an emergency. It’s also a good idea to have multiple copies of your backups in different physical locations, such as on external hard drives or cloud storage services.
The backups consist of::
- MySQL Database file
- Files for the website
The database files are dump files created by the server or also manually exported via PHPMYADMIN (a server extension app that makes working with DB very easy and fast).
We can download the site files via FTP or directly from the server panel.
Step 2: Uploading WordPress Backup Files
To continue with the restoration process of your website, you need to upload your WordPress backup files. This step is crucial.
Here are the steps to follow:
- Access Your Hosting Account: Login to your hosting account and navigate to the File Manager option.
- Check your HTTPS or HTTPDOCS directory. Usually, that’s the public directory of your site or ROOT Directory.
- You have now two options : upload via the Panel File manager or use an FTP application, i prefer to use a SFTP/FTP application like FILEZILLA that’s free and works well
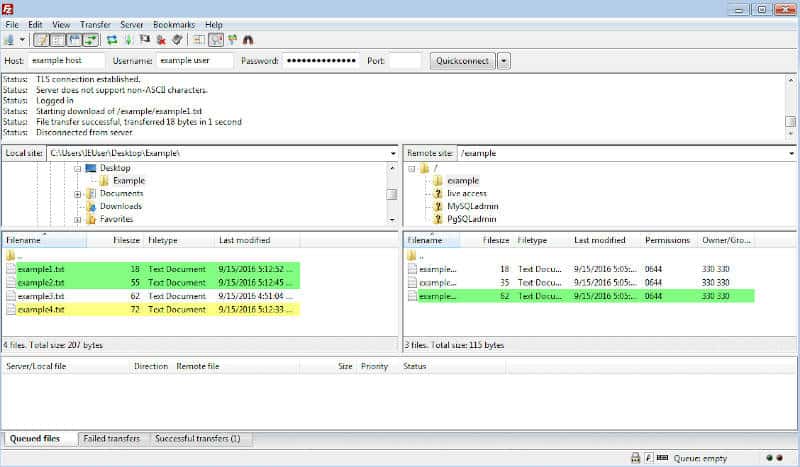 Filezilla interface
Step 3: Importing and restore your WordPress Database
After successfully uploading the backup files in the previous step, it’s time to import the WordPress data to your website. This process involves restoring your website’s content, media, and other essential information from the backup.To do this, navigate to your hosting account and access the phpMyAdmin tool.
Select the database that corresponds to your WordPress site and click on “Import.” Choose the backup file stored on your computer and upload it.
Once uploaded, ensure that the “Partial Import” option is unchecked, then click on “Go.”
The import process may take a few minutes, depending on the size of your backup file. Once the process is complete, the system will send you a success message that confirms the correct import of all data..
A FEW TIPS AND IMPORTANT INFORMATIONS
- If you deleted the database or you’re not sure about the working one in use for your site, you can open the wp-config.php file from your backupped files and you can read the information like : database name, username and password so you can easily re-create it from scratch with the same name
- If you change the database password or username, then you will have to modify the file wp-config.php properly.e
- To edit the php files a simple text editor would work well, i suggest NOTEPAD++ fo win users. It’s another free and great application.
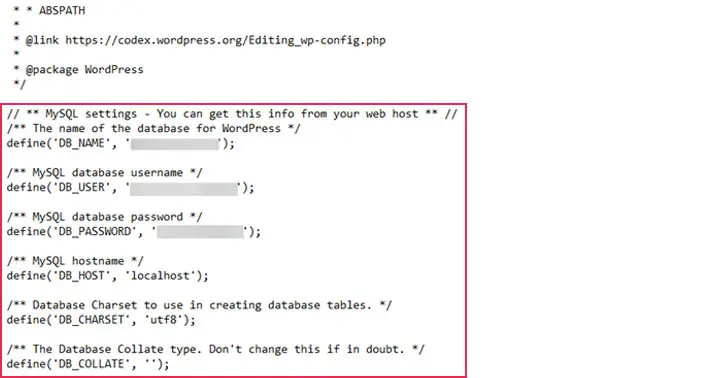 MySQL Database Settings inside wp-config.php
 Notepad++ text editor for files
Step 4: Checking and Adjusting Your WordPress Settings
After completing the import process, it’s important to check your WordPress settings to ensure that everything is working as expected. The first thing you should do is check your permalinks and make sure they’re set up correctly. This will help search engines index your site properly.Next, check your site’s general settings, such as site title and description, time zone, and language. You may also want to review any plugins or themes you have installed and activate or deactivate them as necessary. Finally, take a look at your widgets and menus to ensure they’re displaying correctly on your restored website. Make any necessary adjustments so that everything looks good and functions correctly for your visitors. Overall, taking the time to check and adjust your WordPress settings after restoring your website will help ensure that everything is in order for a positive user experience.
Step 5: Testing Your Restored WordPress Website
After completing the previous steps, it’s time to test your restored WordPress website. The testing phase is crucial as it ensures that everything is working correctly and that your website is fully functional. To begin testing, navigate to your website’s homepage and click through all of your pages and posts. Make sure that all elements are present and functioning, including images, links, forms, and plugins. Test the functionality of any contact or subscription forms by filling them out and submitting them to ensure they are working correctly. You have to log in as a wordpress admin to verify that the right plugins are updated and installed correctly.
Tips and Best Practices for WordPress Website Restoration
Many site admins or users don’t want to take things seriously about website security and disaster recovery.
Till the day something happens and they must act. Then it’s late and/or the options are way more limited.
So take these tips and best practices in mind and act NOW and you’ll thank me later 🙂
- Always keep a backup of your website: It is crucial to have a recent backup of your site in case of any disasters. Ensure to have a reliable and secure backup system that stores your data offsite.
- Check the compatibility of themes and plugins: After restoring your website, it is essential to check if all the themes and plugins are compatible with the current version of WordPress. Some themes or plugins can cause conflicts or errors on different versions.
- Test thoroughly before going live: Before making any site live, ensure you test it thoroughly by checking all the pages, links, forms, images, etc. This will help you identify potential issues or bugs that might cause inconvenience for your users.
- Sometimes also https certificates are migrated in the well-known directory, and since the certificates are tied to the domain, they should work. If you see some strange redirects, just delete that directory and re-issue the SSL from the panel.
- Keep an eye on security: security threats are still prevalent in the online world; therefore, keeping an eye on security measures is crucial after restoring your website. Ensure you have a reputable security plugin installed to prevent cyber attacks and malware infections. I have written several articles about malware and wordpress and also have a live course that you can purchase here: https://learn.digitalfastmind.com/courses/clean-and-restore-a-hacked-wordpress-website-step-by-step-course
BONUS : RESTORING A BACKUP TO ANOTHER DOMAIN
This could be a bit more tricky, but again, it’s just a matter or keeping the workflow smooth.
There are 2 main things to look after:
- The connectors’ detail in the wp-config.php files settings
- The databases entries that contain metadata with the “old” domain url
We need to replace the database name, username, and hostname with the new ones in the wp-config.php file as a first step. This will ensure we can connect to the website and access it.
The second step which istrickier is to install a plugin that will help us replace the entries in the database. I suggest working with : https://bettersearchreplace.com/
Once we access the plugin, we must find and replace the old URL with the new one. The plugin is super fast and well developed. So it’ll be easy to look for all the instances of the “myoldwebsitename” and replace with “mynewwebsite” in a matter of minutes.
This step can also be performed manually in phpmyadmin with some advanced MySQL query, but i don’t recommend doing so unless you’re an average/advanced MySQL user.
Once you restored the website and replaced the website test as usual and make sure all the urls are working well.